Every time I whip up a batch of Red Velvet Marble Waffles, I'm transported back to my childhood, flipping through my mom's cookbooks on lazy Sunday mornings. The vibrant red of the batter, swirling beautifully with the classic waffle mix, always felt like a little celebration on our breakfast table. I'd watch in awe as my mom poured the batter into the waffle iron, the delightful aroma filling the air, making it nearly impossible to wait for the first crispy bite.

These waffles are perfect for any occasion, whether it's a cozy family brunch or a festive holiday breakfast. They bring a splash of color and joy, making every bite feel special. Plus, who wouldn't want to start their day with something that looks as good as it tastes? Trust me, once you try these Red Velvet Marble Waffles, they'll become a cherished recipe in your kitchen too!
Why You'll Love Red Velvet Marble Waffles
- Quick and easy to prepare, taking just 15 minutes to prep and 20 minutes to cook.
- Visually stunning with a marbled effect that's sure to impress your family and guests.
- Perfectly fluffy and deliciously sweet, combining classic waffle flavors with a festive twist.
- Great for any breakfast occasion, from lazy weekends to special celebrations.
- Leftovers can be frozen and reheated, making them a convenient option for busy mornings.
- Customizable with your favorite toppings, from whipped cream to fresh fruit.
Ingredients You'll Need
For the Classic Waffle Batter
- 1 ½ cups all-purpose flour - Use a good quality brand for the best texture.
- 1 tablespoon sugar - This adds just a hint of sweetness; feel free to adjust to taste.
- 1 teaspoon baking powder - Make sure it's fresh for the best rise.
- ½ teaspoon baking soda - This will help the waffles become nice and fluffy.
- ¼ teaspoon salt - A little salt balances the sweetness beautifully.
- 1 cup buttermilk - If you don't have buttermilk, you can substitute with 1 cup of milk plus 1 tablespoon of vinegar or lemon juice, letting it sit for a few minutes.
- 2 large eggs - Preferably at room temperature for even mixing.
- ¼ cup melted butter - You can use unsalted butter for a more controlled flavor.
- 1 teaspoon vanilla extract - Go for pure vanilla for the best flavor.
For the Red Velvet Batter
- 1 cup all-purpose flour - Same quality as the classic batter.
- 2 tablespoons cocoa powder - Use unsweetened cocoa for that rich chocolate flavor.
- ¼ cup sugar - Sweeten to your liking; you can use brown sugar for a deeper flavor.
- 1 teaspoon baking powder - Again, make sure it's fresh.
- ½ teaspoon baking soda - This is key for the red velvet to rise properly.
- ¼ teaspoon salt - Enhances all the flavors in the batter.
- ¾ cup buttermilk - The same tip applies here for substitution.
- 1 large egg - Room temperature recommended.
- ¼ cup melted butter - Unsalted is preferred for adjusting other flavors.
- 1 teaspoon vanilla extract - Pure vanilla is always the best choice.
- 1 tablespoon red food coloring - This is what gives those waffles their signature color; feel free to adjust the amount for deeper or lighter hues.
Step-by-Step Instructions
Make the Classic Waffle Batter
- In a mixing bowl, combine 1 ½ cups of all-purpose flour, 1 tablespoon of sugar, 1 teaspoon of baking powder, ½ teaspoon of baking soda, and ¼ teaspoon of salt. Whisk these dry ingredients together until evenly mixed.
- In another bowl, whisk together 1 cup of buttermilk, 2 large eggs, ¼ cup of melted butter, and 1 teaspoon of vanilla extract until well combined.
- Pour the wet ingredients into the dry ingredients and mix gently until just combined. Don't worry if there are a few lumps; you want to avoid overmixing!
Make the Red Velvet Batter
- In a separate mixing bowl, combine 1 cup of all-purpose flour, 2 tablespoons of cocoa powder, ¼ cup of sugar, 1 teaspoon of baking powder, ½ teaspoon of baking soda, and ¼ teaspoon of salt. Whisk these ingredients together until well mixed.
- In another bowl, whisk together ¾ cup of buttermilk, 1 large egg, ¼ cup of melted butter, 1 teaspoon of vanilla extract, and 1 tablespoon of red food coloring until fully blended.
- Pour the wet ingredients into the dry ingredients and mix gently until just combined, being careful not to overmix.
Preheat the Waffle Iron
- Plug in your waffle iron and preheat it according to the manufacturer's instructions. This usually takes a few minutes; you want it nice and hot for that crispy exterior!
- If your waffle iron has a non-stick surface, you can lightly grease it with a little melted butter or cooking spray for easier release.
Cook the Waffles
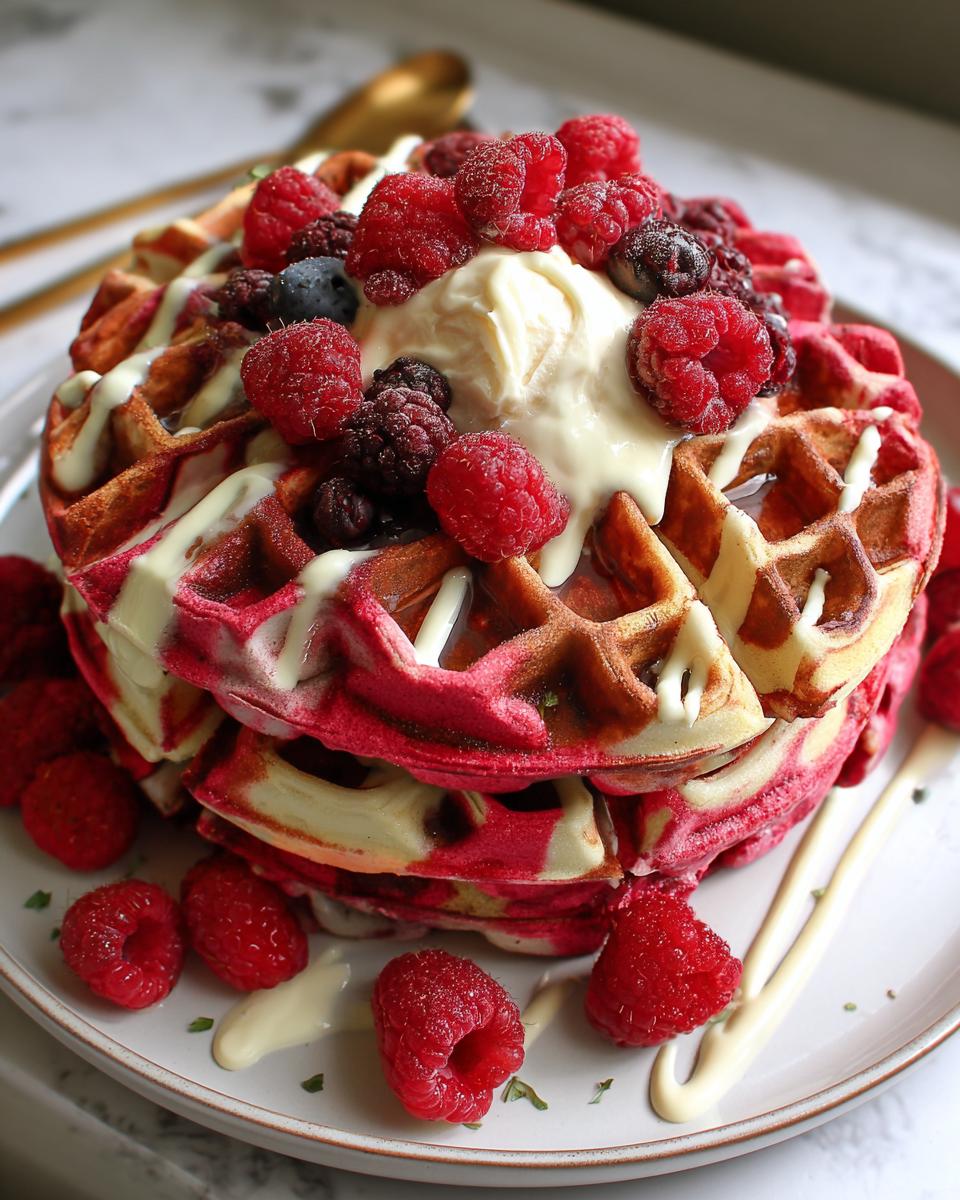
- Once the waffle iron is preheated, pour alternating portions of the classic and red velvet batters onto the center of the waffle iron, creating a marbled effect. You can use a ladle for this, and don't be shy with the batter!
- Close the lid and cook according to your waffle iron's instructions, typically around 5-7 minutes or until the waffles are golden brown and crisp.
- Carefully remove the waffles using a fork or tongs, and repeat the process with the remaining batter.
- Serve warm with your favorite toppings, like whipped cream, fresh berries, or even a drizzle of cream cheese icing for that extra indulgence!
Variations
- For a seasonal twist, add pumpkin spice to the red velvet batter in the fall.
- Try using almond milk or coconut milk instead of buttermilk for a dairy-free version.
- Make it gluten-free by substituting all-purpose flour with a gluten-free blend.
- Add chocolate chips or nuts for extra flavor and texture.
- Experiment with different food coloring shades for a fun, colorful breakfast.
Serving and Storage Tips
Serving
Serve these Red Velvet Marble Waffles warm, topped with a dollop of whipped cream, fresh berries, or a drizzle of cream cheese icing for a delightful treat. They pair beautifully with maple syrup or a sprinkle of powdered sugar for an extra touch of sweetness.
Storage
Store leftover waffles in an airtight container in the fridge for up to 3 days. For longer storage, freeze them in a single layer on a baking sheet, then transfer to a zip-top bag for up to 2 months. Reheat in the toaster or oven for a quick breakfast.
Helpful Notes
- For a lighter version, use egg whites instead of whole eggs.
- Substitute melted coconut oil for butter for a dairy-free option.
- Add in some chopped nuts or chocolate chips to the batters for a fun texture.
- Consider using whole wheat flour for a healthier twist, though it may alter the color slightly.
- For allergy-friendly waffles, ensure all ingredients are gluten-free and use plant-based milk.
Frequently Asked Questions
Can I freeze Red Velvet Marble Waffles?
Yes, you can freeze these waffles! Allow them to cool completely, then place them in a single layer on a baking sheet. Once they're frozen, transfer them to a zip-top bag and store for up to 2 months. Reheat in the toaster or oven for a quick breakfast.
What can I use instead of buttermilk?
If you don't have buttermilk on hand, you can easily substitute it by mixing 1 cup of milk with 1 tablespoon of vinegar or lemon juice. Let it sit for about 5 minutes until it thickens slightly, and you'll have a perfect buttermilk replacement.
How do I store leftover waffles?
Store any leftover waffles in an airtight container in the fridge for up to 3 days. For longer storage, freeze them as mentioned earlier. When ready to enjoy, simply reheat them in the toaster or oven for a quick and delicious breakfast.
Can I make these waffles gluten-free?
Absolutely! To make gluten-free Red Velvet Marble Waffles, substitute all-purpose flour with a gluten-free flour blend. Just be sure to check that all your other ingredients, like baking powder and vanilla extract, are also gluten-free.
Final Thoughts
There's something so special about starting your day with a plate of Red Velvet Marble Waffles. Not only do they bring a pop of color to your breakfast table, but they also infuse your mornings with warmth and joy. I hope you give this recipe a try and share it with your loved ones. Whether it's for a special occasion or just a regular Tuesday, these waffles are sure to create delightful memories. So roll up your sleeves, have fun in the kitchen, and enjoy every delicious bite. You've got this, and I can't wait for you to taste the magic!

Red Velvet Marble Waffles
Equipment
- Waffle Iron
- Mixing bowls
Ingredients
For the Classic Waffle Batter
- 1 ½ cups all-purpose flour
- 1 tablespoon sugar
- 1 teaspoon baking powder
- ½ teaspoon baking soda
- ¼ teaspoon salt
- 1 cup buttermilk
- 2 large eggs
- ¼ cup melted butter
- 1 teaspoon vanilla extract
For the Red Velvet Batter
- 1 cup all-purpose flour
- 2 tablespoons cocoa powder
- ¼ cup sugar
- 1 teaspoon baking powder
- ½ teaspoon baking soda
- ¼ teaspoon salt
- ¾ cup buttermilk
- 1 large egg
- ¼ cup melted butter
- 1 teaspoon vanilla extract
- 1 tablespoon red food coloring
Instructions
- In a mixing bowl, combine all the ingredients for the classic waffle batter. Mix until smooth.
- In another bowl, combine all the ingredients for the red velvet batter. Mix until smooth.
- Preheat the waffle iron. Pour alternating portions of the classic and red velvet batters into the waffle iron to create a marbled effect.
- Cook until the waffles are golden brown and crisp. Serve warm with your favorite toppings.